| Joined: | Mon Apr 2nd, 2012 |
| Location: | South Lakeland, UK |
| Posts: | 4066 |
| Status: |
Offline
|

The preparation and gathering of 'stuff' was far more time consuming and difficult than the actual fitting of the CPU.
I needed some good heat sink thermal compound and some cleaner to clean up the heat sink itself, I also needed to make a tool to unscrew the heatsink retaining screws. An ordinary long 3mm Allen key would have done perfectly well but given I have a ¼" square drive torque wrench I wanted to use it.

I also reread several online articles to ensure I was clear about the procedure.
One thing which concerns me about these articles is they make little or no mention about static precautions. My understanding about static and computers is that a little static can do a little harm without zapping a component completely, it just degrades the component without necessarily killing it completely. So when I am handling memory, motherboards etc. I use an anti static wristband and avoid actions which can create static.
My first move before removing the large heatsink was to get a feel of the tightness of the retaining screws. I released each one then tightened it again to the same point it had been before, then set my torque driver so it did it just the same, so each screw would be exactly right and is exerting an equal pressure on the CPU. As I said earlier a torque driver was by no means essential. I simply wanted to use it because I have had it for well over 20 years and never used it before! I looked up the price and they sell for about £180, so I definitely wouldn't have bought one just for this! I made the 3mm deep hex drive tool by drilling a 3.2mm hole in the end of a short ¼" drive extension in a lathe. Then I hammered a length of 3mm Hex wrench into the hole. It is so tight it won't ever turn in the hole.
I removed the heatsink carefully then cleaned up the copper pad, removed the 4 core 2.66 Ghz CPU and replaced it with my new 6 core 3.06Ghz CPU, clamped it down, carefully applied the thermal paste then replaced the heatsink and torqued it down tightening each screw in turn, diagonally, until the correct torque was reached. Simple as that.
Put the processor tray back in the Mac, turned the power back on and pressed the starter button. I zapped the PRAM on first start up to avoid any possible conflicts arising from old settings from the original CPU. That is done by holding the shift + command + P + R keys down before the computer 'chimes' then releasing them when the Apple appears.
The computer started and ran perfectly, I checked the spec's and they reported the correct CPU as expected.

I went on to run Geekbench tests which reveal I have almost doubled the speed of the computer.

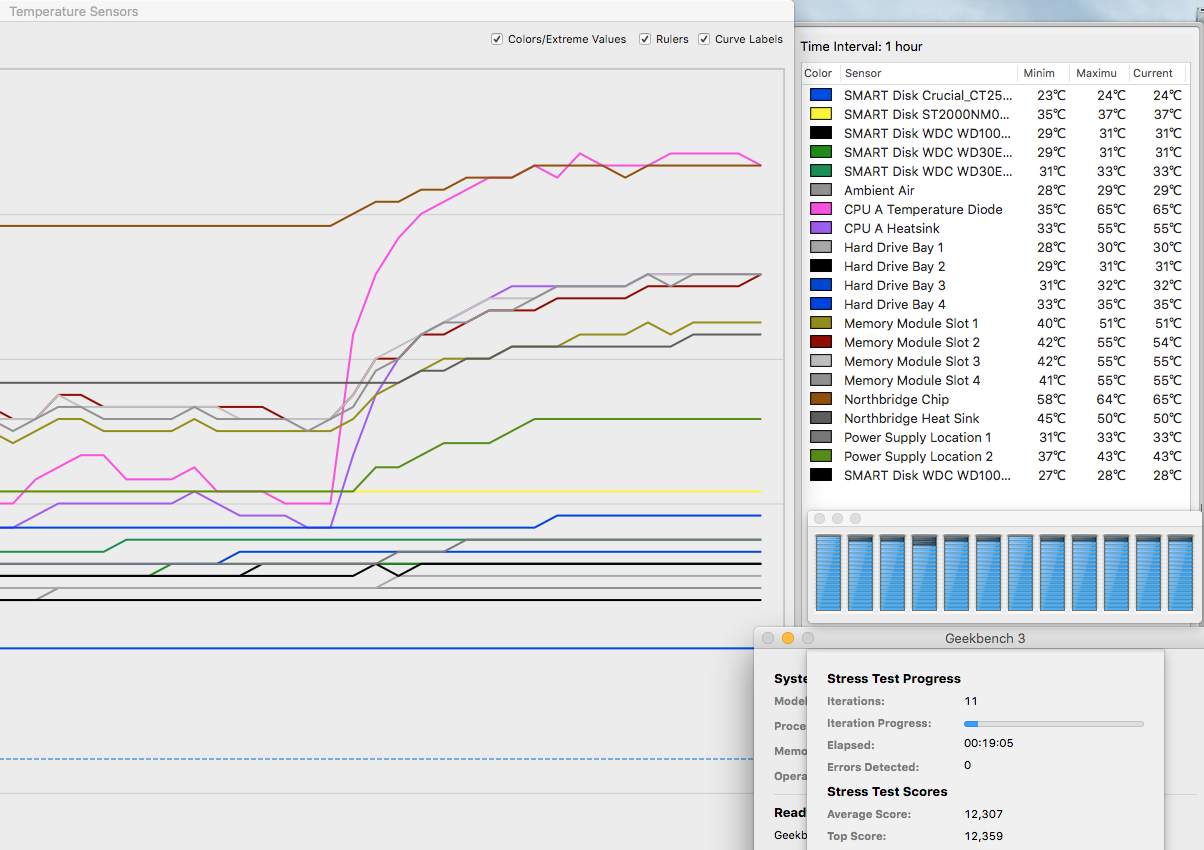
Finally I ran Dr. Marcel Bresink's Hardware Monitor testing software to monitor the temperatures and to perform a stress test. The first graph shows the stress load on all twelve threads of the CPU in the blue column graph and the temperature rise as it soaks the heat sink then as it plateaus out. The second screenshot shows the temperature recovery after the stress test and shows the cores at rest. I am pleased to see the temperature decay matches the rise, suggesting the heat sink is reseated correctly and well matched to it's task. There were no reported errors over the 20 minute stress test duration, in my opinion it passed with flying colours.


In real life it feels much crisper and quicker than it did before. The cost wasn't particularly great using second hand components, which are reasonably available on eBay.
It compares well with a bottom of the range Mac pro 6.1 (current product) and there is still scope to double the performance by using a dual processor tray, which is a two minute slide in job, that would easily take it to 28,000 Geekbench score which is pretty good for an old computer. The really big win is the huge amount of easily accessible on-board storage.
____________________
Robert.